灰度
我们要学习的第一个技术就是将彩色图转换成灰度图,我们首先要明白的一点就是,其实标准的灰度图就是每个像素点的三个通道的值一样或者近似,我们的策略就是将每个像素的每个通道的值都调成一样,取R,G,B值为三者的算数平均数就可以了,比如原色是RGB(169,204,69), 那么最终的RGB就是(169+204+69)/3 = 147.
QImage * MainWindow::greyScale(QImage * origin){
    QImage * newImage = new QImage(origin->width(), origin->height(), QImage::Format_ARGB32);

    QColor oldColor;

    for(int x = 0; x<newImage->width(); x++){
        for(int y = 0; y<newImage->height(); y++){
            oldColor = QColor(origin->pixel(x,y));
            int average = (oldColor.red()+oldColor.green()+oldColor.blue())/3;
            newImage->setPixel(x,y,qRgb(average,average,average));
        }
    }

    return newImage;
}
亮度
就如之前我们提到的,白色用RGB(255,255,255)表示,黑色用RGB(0,0,0)表示,所以如果我们需要提高图片的亮度(颜色接近白色),我们需要同时增加三个通道的数值,反之就是变暗。
在这里我们添加了一个函数参数来决定要提高多少亮度,如果参数是负数的话就是减少亮度了。在每个通道都加上delta值之后,需要做的就是让它不要低于0且不要高于255.
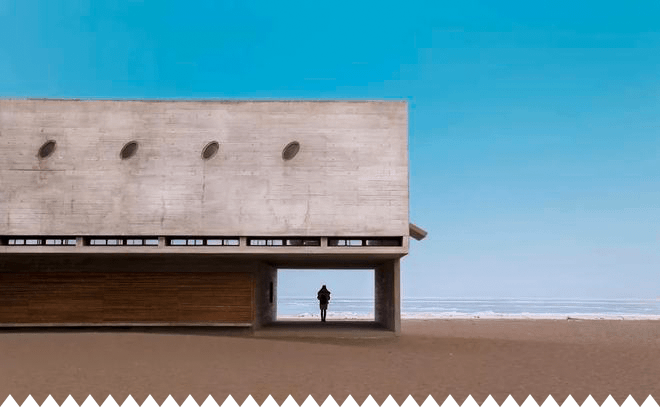
暖色调
当我们说一一幅暖色调的图片的时候通常是因为这张图色调偏黄。我们没有黄色的通道,但是红色和绿色混合起来就是黄色,所以我们增加这两个通道值,然后蓝色通道值不变就好了。
我们使用一个delta参数来决定增加红色和绿色通道的值。一张暖色的图片能够给人一种复古效果,如果是有沙子的图片,图片将会更加生动。
QImage * MainWindow::warm(int delta, QImage * origin){
    QImage *newImage = new QImage(origin->width(), origin->height(), QImage::Format_ARGB32);

    QColor oldColor;
    int r,g,b;

    for(int x=0; x<newImage->width(); x++){
        for(int y=0; y<newImage->height(); y++){
            oldColor = QColor(origin->pixel(x,y));

            r = oldColor.red() + delta;
            g = oldColor.green() + delta;
            b = oldColor.blue();

            //we check if the new values are between 0 and 255
            r = qBound(0, r, 255);
            g = qBound(0, g, 255);

            newImage->setPixel(x,y, qRgb(r,g,b));
        }
    }

    return newImage;
}
冷色调
如果说暖色调的图片偏黄色,那么冷色调的图片应该就是偏蓝色了。在这个方法里面我们只增加蓝色通道的值,红色和绿色的值不变。
冷色调的图片可以联想到未来,死亡或者,冷。
QImage * MainWindow::cool(int delta, QImage * origin){
    QImage *newImage = new QImage(origin->width(), origin->height(), QImage::Format_ARGB32);

    QColor oldColor;
    int r,g,b;

    for(int x=0; x<newImage->width(); x++){
        for(int y=0; y<newImage->height(); y++){
            oldColor = QColor(origin->pixel(x,y));

            r = oldColor.red();
            g = oldColor.green();
            b = oldColor.blue()+delta;

            //we check if the new value is between 0 and 255
            b = qBound(0, b, 255);

            newImage->setPixel(x,y, qRgb(r,g,b));
        }
    }

    return newImage;
}
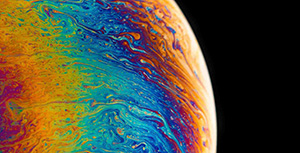
饱和度
我们已经说了,颜色由三个通道组成:红,绿,蓝,尽管如此,RGB不是唯一一个表示色彩的方式,在这里,我们使用HSL格式表示色彩 - hue(色相), saturation(饱和度), lightness(明度)。
饱和的图像拥有更加生动的颜色,通常会比较好看,但是有一点要记住:不要滥用饱和度,因为很容易出现失真。
QImage * MainWindow::saturation(int delta, QImage * origin){
    QImage * newImage = new QImage(origin->width(), origin->height(), QImage::Format_ARGB32);

    QColor oldColor;
    QColor newColor;
    int h,s,l;

    for(int x=0; x<newImage->width(); x++){
        for(int y=0; y<newImage->height(); y++){
            oldColor = QColor(origin->pixel(x,y));

            newColor = oldColor.toHsl();
            h = newColor.hue();
            s = newColor.saturation()+delta;
            l = newColor.lightness();

            //we check if the new value is between 0 and 255
            s = qBound(0, s, 255);

            newColor.setHsl(h, s, l);

            newImage->setPixel(x, y, qRgb(newColor.red(), newColor.green(), newColor.blue()));
        }
    }

    return newImage;
}
模糊
这个效果相对于之前的有一点点复杂。我们会用到一个卷积滤波器,根据当前像素的颜色和相邻像素的颜色来获得一个新的颜色。同时还有一个kernel的矩阵来决定计算中相邻像素的影响程度。
原像素会在矩阵的中心,因此我们会使用基数行的行和列。我们不会修改边缘的像素点,因为那些点没有我们需要的相邻像素点,虽然我们也可以只使用有效的像素点。
QImage * MainWindow::blur(QImage * origin){
    QImage * newImage = new QImage(*origin);

    int kernel [5][5]= {{0,0,1,0,0},
                        {0,1,3,1,0},
                        {1,3,7,3,1},
                        {0,1,3,1,0},
                        {0,0,1,0,0}};
    int kernelSize = 5;
    int sumKernel = 27;
    int r,g,b;
    QColor color;

    for(int x=kernelSize/2; x<newImage->width()-(kernelSize/2); x++){
        for(int y=kernelSize/2; y<newImage->height()-(kernelSize/2); y++){

            r = 0;
            g = 0;
            b = 0;

            for(int i = -kernelSize/2; i<= kernelSize/2; i++){
                for(int j = -kernelSize/2; j<= kernelSize/2; j++){
                    color = QColor(origin->pixel(x+i, y+j));
                    r += color.red()*kernel[kernelSize/2+i][kernelSize/2+j];
                    g += color.green()*kernel[kernelSize/2+i][kernelSize/2+j];
                    b += color.blue()*kernel[kernelSize/2+i][kernelSize/2+j];
                }
            }

            r = qBound(0, r/sumKernel, 255);
            g = qBound(0, g/sumKernel, 255);
            b = qBound(0, b/sumKernel, 255);

            newImage->setPixel(x,y, qRgb(r,g,b));

        }
    }
    return newImage;
}
锐化
像模糊中一样,锐化一张图片也会使用一个卷积滤波器,但是kernel矩阵是不一样的,相邻像素对应的值是负的。
锐化能够处理模糊的照片,能够提升细节。
QImage * MainWindow::sharpen(QImage * origin){
    QImage * newImage = new QImage(* origin);

    int kernel [3][3]= {{0,-1,0},
                        {-1,5,-1},
                        {0,-1,0}};
    int kernelSize = 3;
    int sumKernel = 1;
    int r,g,b;
    QColor color;

    for(int x=kernelSize/2; x<newImage->width()-(kernelSize/2); x++){
        for(int y=kernelSize/2; y<newImage->height()-(kernelSize/2); y++){

            r = 0;
            g = 0;
            b = 0;

            for(int i = -kernelSize/2; i<= kernelSize/2; i++){
                for(int j = -kernelSize/2; j<= kernelSize/2; j++){
                    color = QColor(origin->pixel(x+i, y+j));
                    r += color.red()*kernel[kernelSize/2+i][kernelSize/2+j];
                    g += color.green()*kernel[kernelSize/2+i][kernelSize/2+j];
                    b += color.blue()*kernel[kernelSize/2+i][kernelSize/2+j];
                }
            }

            r = qBound(0, r/sumKernel, 255);
            g = qBound(0, g/sumKernel, 255);
            b = qBound(0, b/sumKernel, 255);

            newImage->setPixel(x,y, qRgb(r,g,b));

        }
    }
    return newImage;
}
金属效果
这个例子中我们会结合几种技术来获得一种效果。下面是处理的步骤:
1.调整图像的亮度,获得一个较暗的图片。
2.将图像转成灰度。
3.将灰度图绘制在金属的纹理上,透明度50%。
QImage * MainWindow::metal(QImage * origin){
    QImage * newImage = new QImage(":images/metal.png");
    QImage * darkImage = brightness(-100, origin);
    QImage * greyImage = greyScale(darkImage);
    QPainter painter;

    painter.begin(newImage);

    painter.setOpacity(0.5);
    painter.drawImage(0, 0, * greyImage);

    painter.end();

    delete greyImage;
    delete darkImage;

    return newImage;
}

评论区